
Hippo Happiness Bundle
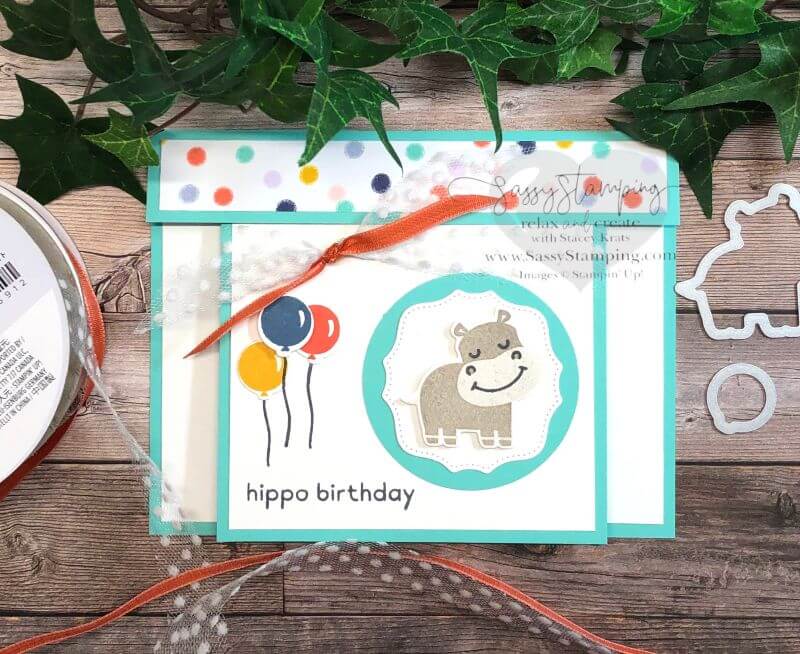
Today’s card features the Stampin’ Up! Hippo Happiness Bundle. I chose this fun fold to showcase the hippo because of its clean and playful layout. Of course, I couldn’t resist the polka-dot paper from the Playing With Patterns DSP pack. I love polka-dots and it showcases my daughter’s favorite colors; so naturally it was a no-brainer for me!
Another fun aspect of this bundle are the dies! You can see one of them in white behind the hippo. Notice the stitching! There are 3 different shapes and multiple sizes. Perfect for accents and labels!
Card Instructions:
- Cut an 8 ½” x 11″ piece of Coastal Cabana Cardstock to 5 ½” x 5 ¼”. Score the 5 ½” side at 1″ and fold over; this is your card base.
- Cut a 4″ x 4″ square of Coastal Cabana
- Cut a 5 ¼” x 4″ in Whisper White
- Cut a 3 ¾” x 3 ¾” square of Whisper White Cardstock
- Cut a 5 ¼” x ¾” piece of Playing with Patterns DSP in the polka-dot pattern
- Cut a 2 ¼” circle out of Coastal Cabana using the circle punch
- Ink the full hippo shape in Gray Granite and stamp off once. Without re-inking, stamp the image onto a scrap piece of Whisper White Cardstock
- Ink the partial hippo shape in Gray Granite and stamp in full strength over the 1st image being careful to line up the images as best you can
- Stamp the hippo face in Memento Black
- Stamp the 3 balloons in the other colors on a scrap piece of Whisper White
- Stamp the sentiment onto the 3 ¾” x 3 ¾” piece of Whisper White as shown
- Die cut the white background piece, the hippo and 3 balloons using the coordinating dies
- Adhere the polka-dot paper to the front of the small fold on the card base
- Adhere the white cutout to the 2 ¼” circle using Stampin’ Seal
- Adhere the hippo to the white cutout using Mini Stampin’ Dimensionals
- Adhere the hippo circle to the 3 ¾” square piece using Stampin’ Seal as shown
- Adhere the 3 ¾” piece to the 4″ square piece using Stampin’ Seal
- Adhere the 5 ¼” x 4″ Whisper White piece to the card base using Stampin’ Seal
- Line up the 4″ square piece on the card base making sure it is centered and flush to the bottom
- Apply Stampin’ Seal to the very top of the 4″ square piece all the way across, making sure you don’t get adhesive on the card base
- Fold the top layer down and adhere together
- Wrap the polka-dot tulle ribbon around the 4″ square piece leaving enough of a tail at the start to tie a knot. Once tied, cut the ribbon off the spool and trim ends to length desired
- Cut a 6″ piece of the Terracotta Tile ribbon and tie in a knot around center of polka-dot ribbon. Trim ends
- Adhere 2 of the balloons using Stampin’ Seal and one using a Mini Stampin’ Dimensional
- Stamp the balloon strings in Memento Black
Enjoy!
Product List
| |||
|
| ||
|
|
|
|
|
")
")


 Designer Series Paper")


 Polka Dot Tulle Ribbon")

 Circle Punch")


[social_warfare]
Leave a Reply